SuperCollider + Arduino #1
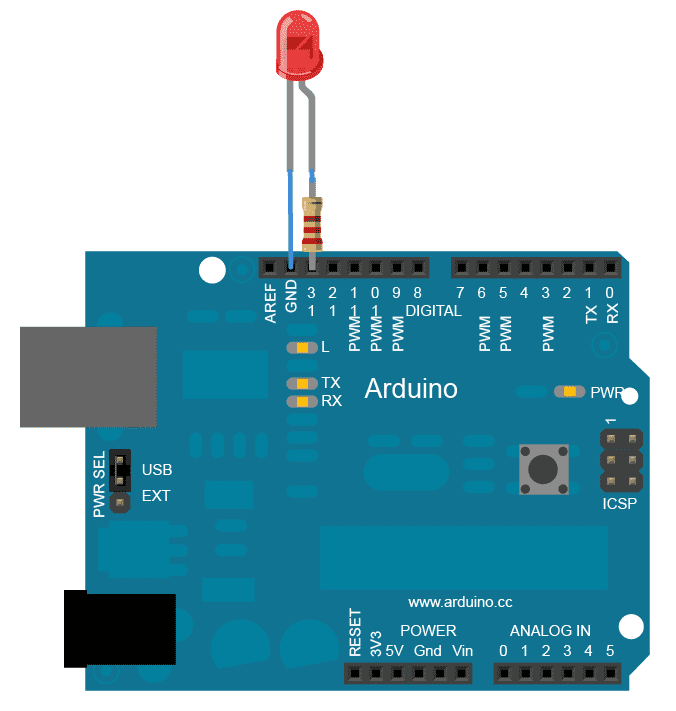
In this page we will learn the basics of serial communication between SuperCollider and Arduino. To start off we’re going to control the brightness of LED from SuperCollider! First, our circuit:

Now, in Arduino upload:
unsigned char val = 0;

void setup() {
  Serial.begin(9600);
  pinMode(11, OUTPUT); // use one of the ~ pwm pins!
}

void loop() {
  if (Serial.available()) {
    val = Serial.read();
    analogWrite(11, val);
  }
}
Finally in SuperCollider:
// evaluate to find the name of your arduino
SerialPort.listDevices;
// see post window

// make sure serial monitor is not open in arduino IDE
// then open port
(
~port = SerialPort(
	"/dev/cu.usbmodem141101", // your arduino's name
	baudrate: 9600, // must match arduino rate
	crtscts: true
);
)

// send to arduino
// maximum brightness
~port.put(255);

// minimum
~port.put(0);

// random flicker
r = Routine { loop { ~port.put(1.exprand(255)); 0.3.wait } }.play;

// stop
r.stop;

// close before quitting
~port.close;
More than 1 LED?
When controlling more than 1 LED, we need to identify them. In Arduino:
unsigned char val = 0;
unsigned char id = 0;

void setup() {
  Serial.begin(9600);
  // use 2 of ~ pwm pins
  pinMode(11, OUTPUT);
  pinMode(9, OUTPUT);
}

void loop() {
  // need to wait till you get
  // more than 1 data
  if (Serial.available() > 1) {
    id = Serial.read();
    val = Serial.read();
    analogWrite(id, val);
  }
}
and in SuperCollider:
// evaluate to find the name of your arduino
SerialPort.listDevices;
// see post window

// make sure serial monitor is not open in arduino IDE
// then open port
(
~port = SerialPort(
	"/dev/cu.usbmodem141101", // your arduino's name
	baudrate: 9600, // must match arduino rate
	crtscts: true
);
)

// send id & brightness to arduino
// pin 11 maximum brightness
~port.putAll([11, 255]);

// pin 11 minimum
~port.putAll([11, 0]);

// or 2 in 1
// both pins max brightness
~port.putAll([11, 255, 9, 255]);

// both pins off
~port.putAll([11, 0, 9, 0]);

// close before quitting
~port.close;
SuperCollider + Arduino #2
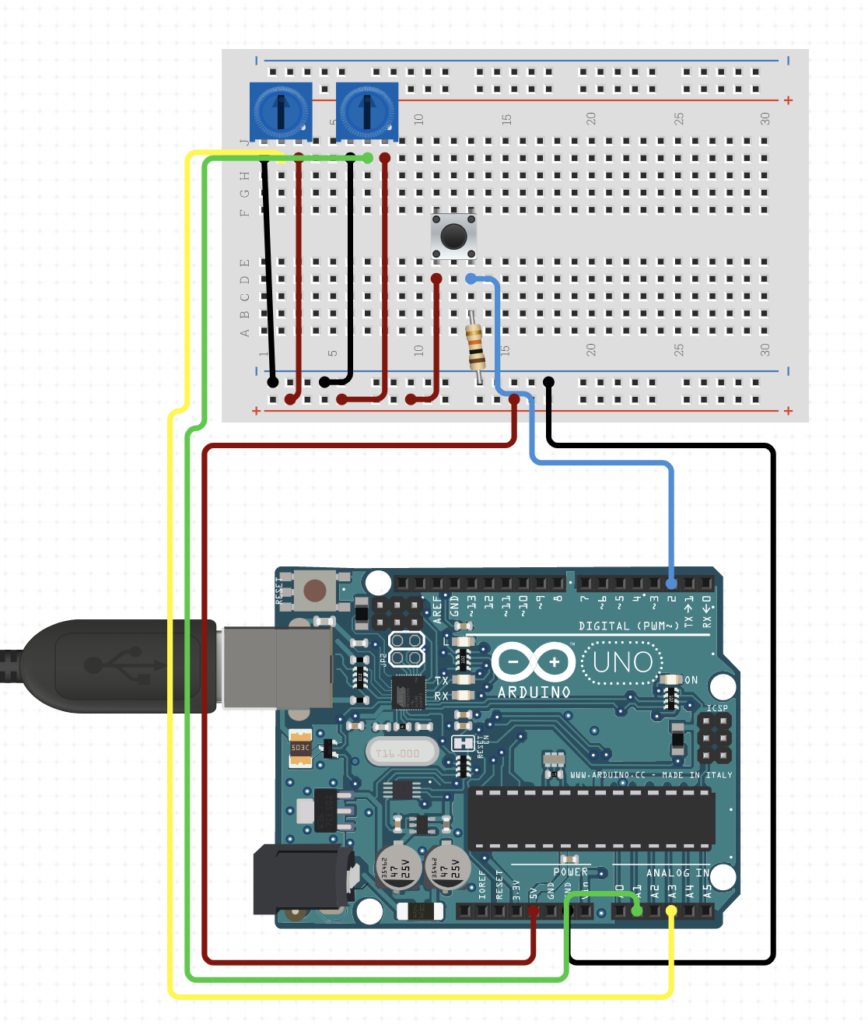
In the examples above we controlled LEDs from SuperCollider. Here, however, we are going to do the opposite: using a push button and potentiometer on Arduino to control sounds in SuperCollider.

In Arduino:
int push = 0;
int pot0 = 0;
int pot1 = 0;

void setup() {
  Serial.begin(9600);
  pinMode(2, INPUT); // our push button
  waitForSuperCollider();
}

// a monitor function waiting to 'handshake' with supercollider
void waitForSuperCollider() {
  while (Serial.available() <= 0) {
    // send an initial string. must match the number of values you want to send
    Serial.println("0,0,0");
    delay(300);
  }
}

void loop() {
  if (Serial.available() > 0) {

    // read from supercollider
    Serial.read();

    // our readings in arduino
    push = digitalRead(2);
    pot0 = analogRead(A1);
    delay(10); // delay in between analog reads for stability
    pot1 = analogRead(A2);

    // below will serial print an array of values
    Serial.print(push);
    Serial.print(","); // adding comma!
    Serial.print(pot0);
    Serial.print(","); // adding comma!
    Serial.println(pot1); // finally, break line!
  }
}
In SuperCollider:
// evaluate to find the name of your arduino
SerialPort.listDevices;
// see post window

// make sure serial monitor is not open in arduino IDE
// then open port
(
~port = SerialPort(
	"/dev/cu.usbmodem141101", // your arduino's name
	baudrate: 9600, // must match arduino rate
	crtscts: true
);
)

// a loop for reading from arduino
(
~routine = Routine {
	var byte, str, val;
	inf.do { |i|
		if(~port.read == Char.nl.asInteger, {
			str = "";
			while(
				{ byte = ~port.read; byte != Char.ret.asInteger },
				{ str = str ++ byte.asAscii }
			);
			val = str.split(Char.comma).asInteger;

			// our sound
			// triggered and controlled form arduino

			// push button = on/off sound
			// pot0 = freq
			// pot1 = amp

			if(val[0] == 1, {
			{ SinOsc.ar(
				val[1].linexp(0, 1023, 400, 1600), 0,
				val[2].linlin(0, 1023, -30, -16).dbamp
			) * Env.perc(0.01, 0.1).kr(2) }.play;
			});
		});
	};
}.play;
)

// this will kick off reading (handshaking with arduino)
~port.put(0);

// stop
~routine.stop; ~port.close;